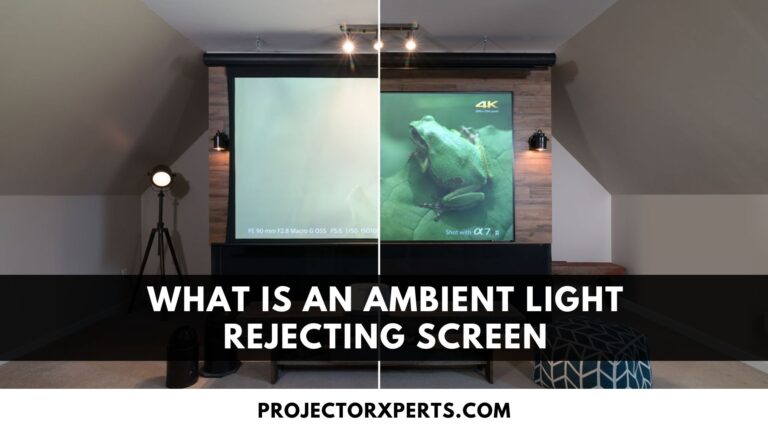
How to Connect Android TV Box to Projector? Step By Step Guide
Connecting your Android TV Box to a projector allows you to enjoy your favorite movies, TV shows, and games on a much larger screen, providing a truly immersive experience. Whether you want to host a movie night with friends or have a gaming marathon with stunning visuals,
Get ready to unlock the full potential of your home entertainment system and create unforgettable moments on the big screen. Let’s dive in and explore how to connect your Android TV Box to a projector for an extraordinary viewing experience.
Connecting your Android TV Box to a projector opens up a whole new world of entertainment possibilities. Whether you want to enjoy movies, stream your favorite TV shows, or indulge in gaming marathons on a bigger screen, this guide will walk you through the simple steps to make this magical connection.
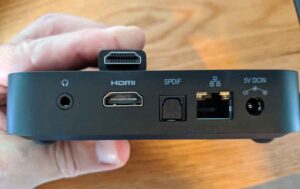
Android TV Box and Projector Ports
Before diving into the connection process, it’s crucial to examine the available ports on both your Android TV Box and projector. Most Android TV Boxes come equipped with an HDMI port, which is the standard interface for transmitting high-definition audio and video signals. On the other hand, projectors typically feature multiple ports, including HDMI, VGA, or USB.
Acquire the Required Cables
Once you have identified the available ports on your Android TV Box and projector, it’s time to gather the necessary cables. If both devices support HDMI, your best bet is an HDMI cable, as it provides the highest quality transmission. If your projector lacks an HDMI port, you may need an HDMI to VGA or HDMI to USB adapter, depending on the available connections. Ensure that the cables and adapters you acquire are compatible with your specific devices.
Power Off All Devices
Before establishing any connections, it’s essential to power off both your Android TV Box and projector. This ensures safety and prevents potential damage to the devices or ports.
Connect the HDMI Cable
Take one end of the HDMI cable and insert it into the HDMI port on your Android TV Box. The HDMI port is usually located at the back or side of the device, labeled as “HDMI.” Gently push the cable until it fits securely into the port.
Connect the HDMI Cable to the Projector
Now, take the other end of the HDMI cable and plug it into the HDMI port on your projector. Again, refer to the projector’s manual or look for a port labeled “HDMI.” Make sure the connection is firm and secure.
Power On the Devices
With the HDMI connection established, it’s time to power on your Android TV Box and projector. Switch on the Android TV Box first, allowing it to boot up completely. Next, turn on your projector and wait for it to initialize. Make sure both devices are set to the correct input source (HDMI, VGA, etc.), which can be selected using the projector’s remote control or menu buttons.
Configure Android TV Box Settings
Once your Android TV Box and projector are powered on and connected, navigate to the settings menu on your Android TV Box. Depending on the model and operating system, you may find the settings icon in the app drawer, on the home screen, or in the notification shade. Look for the “Display” or “Screen” settings and select the appropriate resolution and display mode that suits your projector’s capabilities. Common options include 1080p, 720p, or “Auto” if your projector supports multiple resolutions.
Enjoy the Big Screen Experience
You have successfully connected your Android TV Box to a projector. Now it’s time to immerse yourself in the larger-than-life entertainment experience. Browse through your favorite streaming apps, play games, or indulge in cinematic adventures on the projector’s expansive display. Don’t forget to adjust the projector’s focus and position to ensure a sharp and perfectly aligned image.
Remember, the specific steps and settings may vary slightly depending on the Android TV Box and projector models. Always consult the user manuals for detailed instructions tailored to your particular devices. With this simple connection, you can transform your Android TV Box into a powerhouse of entertainment, bringing your favorite content to life on the big screen.
FAQs About How to Connect Android TV Box to Projector
Can I connect my Android TV box to any type of projector?
Yes, most Android TV boxes have standard HDMI outputs that can be connected to any projector with an HDMI input.
What cable do I need to connect the Android TV box to the projector?
You’ll need an HDMI cable to connect the HDMI output of the Android TV box to the HDMI input of the projector.
Do I need to adjust any settings on my Android TV box before connecting it to the projector?
In most cases, the Android TV box should automatically detect the display and adjust settings accordingly. However, you might need to adjust resolution settings if necessary.
Can I use a wireless connection instead of a cable?
Yes, some projectors support wireless connections via technologies like Miracast or Chromecast. Make sure your Android TV box and projector both support the same wireless technology.
What do I do if there’s no sound after connecting?
Check the audio output settings on your Android TV box and ensure that the projector’s audio source is set to HDMI.
Can I mirror my Android device’s screen to the projector through the TV box?
Yes, many Android TV boxes support screen mirroring or casting from your Android phone or tablet.
Do I need an internet connection to connect the Android TV box to the projector?
No, you can connect them using an HDMI cable without needing an internet connection. However, an internet connection might be required for streaming content.
My projector’s image is not displaying correctly. What should I do?
Double-check that the HDMI cable is securely connected and try changing the input source on the projector. You may also need to adjust the resolution settings on the Android TV box.
Can I use the projector remote to control the Android TV Box?
Generally, you can’t use the projector remote to directly control the Android TV Box. You’ll need the TV Box remote or a compatible wireless keyboard/mouse or a smartphone app for control.
Related: How to Connect Epson Projector to Soundbar?
Conclusion:
Connecting your Android TV Box to a projector is a straightforward process that can elevate your entertainment experience to new heights. By following a few simple steps, you can immerse yourself in the world of movies, TV shows, and gaming on a larger-than-life display.
First, ensure that both your Android TV Box and projector have compatible ports. HDMI is the most common option, but VGA or USB may be used with the help of adapters. Gather the necessary cables and adapters accordingly.
Before establishing any connections, power off both devices to ensure safety. Your Android TV box should have an HDMI port, and your projector should have an HDMI port. Ensure the connection is secure.
Power on your Android TV Box, allowing it to boot up completely, and then turn on your projector. Make sure both devices are set to the correct input source, such as HDMI or VGA, using the projector’s remote control or menu buttons.
Access the settings menu on your Android TV Box and configure the display settings to match your projector’s capabilities. Select the appropriate resolution and display mode for optimal viewing.
Once everything is set up, sit back, relax, and enjoy the big screen experience. Whether you’re streaming your favorite shows, watching movies, or gaming, the larger display of the projector will enhance your enjoyment.
Remember to consult the user manuals for specific instructions tailored to your Android TV Box and projector models. By following these steps, you can seamlessly connect your Android TV Box to a projector and unlock a whole new level of entertainment.
So, get ready to embark on a cinematic journey or indulge in gaming adventures on a grand scale. Connect your Android TV Box to a projector and let the magic unfold before your eyes. Enjoy the immersive experience and make every moment on the big screen count!