How to Connect Laptop to Projector with HDMI? Step-by-Step Laptop to Projector Link
In today’s digital age, multimedia presentations and immersive entertainment have become integral aspects of our professional and personal lives. When it comes to showcasing your ideas, images, or videos on a larger screen, connecting your laptop to a projector with HDMI proves to be a game-changer. Whether you’re delivering a captivating presentation or hosting a movie night with friends, this simple yet powerful connection opens up a world of possibilities.
In this comprehensive guide, we will walk you through the step-by-step process of seamlessly connecting your laptop to a projector using an HDMI cable. From gathering the necessary equipment to configuring the settings for optimal performance, we’ll cover everything you need to know. Say goodbye to tangled wires and blurry visuals, as we help you harness the full potential of this versatile laptop-to-projector connection.
Unlock the door to immersive visuals, crisp sound, and impactful presentations as we delve into the art of connecting your laptop to a projector with HDMI. Get ready to bring your content to life on the big screen and leave a lasting impression on your audience, all with a few simple clicks and a single cable connection. Embrace the world of possibilities that HDMI connectivity offers and elevate your multimedia experience to new heights. Let’s get started on this exciting journey of seamless laptop-to-projector connection!
Setting Up the Connection
Gather the Required Equipment
Before diving into the setup process, make sure you have all the necessary equipment at hand. To connect your laptop to a
projector with HDMI, you’ll need
- A laptop with an HDMI output port
- A projector with an HDMI input port
- An HDMI cable of sufficient length to connect the devices
- Power cables for both the laptop and the projector
- Ensure Compatibility between Laptop and Projector
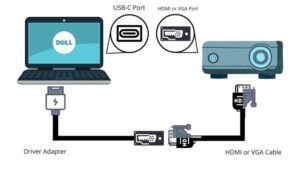
Compatibility is crucial when connecting devices. Check the specifications of your laptop and projector to ensure they support HDMI connectivity. Look for HDMI symbols near the ports on both devices. If either device lacks an HDMI port, you may need an adapter or alternative connection method.
Identify HDMI Ports on the Laptop and Projector
Locate the HDMI ports on your laptop and projector. Typically, the HDMI port on a laptop is a standard rectangular shape, while the projector’s HDMI port may vary depending on the model. Refer to the user manuals or manufacturer’s websites if you’re unsure about the port’s location.
Connecting the Laptop to the Projector with HDMI
Step-by-Step Process for Connecting HDMI Cable
- Power off both the laptop and the projector.
- Connect one end of the HDMI cable to your laptop’s HDMI output port.
- Connect the other end of the HDMI cable to the projector’s HDMI input port.
- Power on the projector and set it to the correct HDMI input source.
- Power on the laptop and wait for it to detect the projector.
- Troubleshooting Common Connection Issues
In some cases, the connection may not be established smoothly. Here are some common issues and their troubleshooting steps:
- No Signal on Projector: Double-check the HDMI connections and ensure both devices are powered on. Try using a different HDMI cable or port.
- Incorrect Display on Projector: Adjust the display settings on your laptop to mirror or extend the desktop to the projector.
- Audio Issues: If the audio is not playing through the projector’s speakers, check the audio output settings on your laptop and the projector.
Remember that each device’s setup might vary slightly, so referring to the user manuals can be helpful during troubleshooting.
Configuring Laptop and Projector Settings
Adjust Laptop Display Settings for External Output
After successfully connecting your laptop to the projector via HDMI, you may need to adjust the display settings for optimal output. Follow these steps:
Windows OS:
- Right-click on the desktop and select “Display Settings.”
- Under “Multiple Displays,” choose “Duplicate” to mirror your laptop screen on the projector or “Extend” to use the projector as an additional display.
- Adjust the resolution settings to match the projector’s native resolution for the best picture quality.
macOS:
- Click the Apple logo and go to “System Preferences.”
- Choose “Displays” and navigate to the “Arrangement” tab.
- Check the “Mirror Displays” box to duplicate your laptop screen or uncheck it for extended mode.
- Set the resolution to match the projector’s native resolution.
- Optimize Projector Settings for Best Performance
To ensure the projector delivers the best performance, fine-tune its settings accordingly:
Focus and Keystone Correction:
- Adjust the focus ring on the projector lens to sharpen the image.
- Use keystone correction (digital or manual) to eliminate any distortion caused by projecting at an angle.
Brightness and Contrast:
- Calibrate brightness and contrast settings to suit the environment and improve visibility.
Color and Picture Modes:
- Select an appropriate picture mode based on the content (e.g., presentation, movie, gaming) for accurate colors and image quality.
Aspect Ratio:
- Set the aspect ratio to match your laptop’s resolution for the correct proportions.
Audio Output:
- If the projector has built-in speakers, ensure the audio output is directed to them to accompany your presentation.
Presenting with Laptop and Projector
Preparing Your Presentation on the Laptop
Before the presentation, organize your files and test the presentation’s compatibility with the projector setup. Here’s a checklist to help you prepare:
- File Formats: Save your presentation in a widely compatible format, such as PDF or PPT, to avoid formatting issues.
- File Location: Keep the presentation file in an easily accessible location on your laptop for quick access.
- Test Run: Practice the presentation on your laptop to familiarize yourself with the slides and transitions.
Tips for a Seamless Presentation Experience
- Arrive Early: Set up your laptop and test the connection to the projector well before the presentation starts.
- Backup Plan: Have a backup of the presentation on a USB drive or cloud storage in case of any technical glitches.
- Engage the Audience: Make eye contact, speak clearly, and use visuals effectively to keep the audience engaged.
- Interact with Content: Utilize the extended display to view presenter notes or control the presentation while facing the audience.
Disconnecting the Laptop from the Projector
Properly Disconnecting HDMI Cable
After concluding your presentation, it’s essential to disconnect the HDMI cable properly to avoid any potential damage. Follow these steps:
- Close Presentation: Close the presentation software on your laptop.
- Power Off Devices: Power off the projector and the laptop.
- Allow Cooling: Give both devices a few minutes to cool down before disconnecting any cables.
- Remove HDMI Cable: Gently remove the HDMI cable from both the laptop and the projector. Powering Down the Projector and Laptop
- Projector: Follow the manufacturer’s instructions for safely turning off the projector. Some projectors have a cool-down period after powering off.
- Laptop: Shut down your laptop using the appropriate power options in the operating system.
Related:
Additional Tips and Tricks
Maximizing Audio-Visual Quality
To enhance your laptop-to-projector setup, consider the following tips:
- External Speakers: If the projector’s built-in speakers don’t meet your audio needs, connect external speakers for better sound quality.
- High-Quality Cables: Invest in good-quality HDMI cables to ensure stable and reliable connections.
- Display Adapter: In case your laptop lacks an HDMI port, use a compatible display adapter to connect to the projector.
Exploring Advanced Projection Features
Many projectors offer additional features to improve your presentation experience:
- Wireless Connectivity: Some projectors support wireless connection options, reducing cable clutter and providing flexibility during presentations.
- Keystone Adjustment: Advanced projectors may have automatic or motorized keystone adjustment for quicker setup.
- Screen Mirroring: Explore screen mirroring options for casting content directly from your smartphone or tablet to the projector.
Troubleshooting Common Issues
Projector Not Detecting Laptop Signal
If the projector fails to detect your laptop’s signal, consider these troubleshooting steps:
- Check Connections: Ensure all HDMI connections are secure and the cable is undamaged.
- Input Source: Verify that the projector is set to the correct HDMI input source.
- Function Keys: On some laptops, pressing the appropriate function key (e.g., Fn + F4) can toggle between display modes.
Laptop Screen Resolution Problems
If the projected image appears distorted or cut off, address the screen resolution:
- Display Settings: Adjust the laptop’s display settings to match the projector’s native resolution.
- Aspect Ratio: Set the aspect ratio to 16:9, which is commonly used for presentations.
Conclusion
In conclusion, connecting your laptop to a projector via HDMI opens up a world of possibilities for presentations, entertainment, and more. By following the steps outlined in this guide, you can seamlessly connect, configure, and present with confidence. Remember to troubleshoot any potential issues and explore advanced features for an enhanced experience. Embrace the versatility of this setup and make your presentations shine on the big screen!