How to Connect Nintendo Switch to Projector?
Sure, connecting your Nintendo Switch to a projector opens up a whole new world of gaming excitement! Playing games on a larger screen can enhance the immersive experience and make your gameplay even more enjoyable. In this guide, we’ll walk you through the step-by-step process of connecting your Nintendo Switch to a projector, so you can start gaming on the big screen in no time!
Check Your Equipment
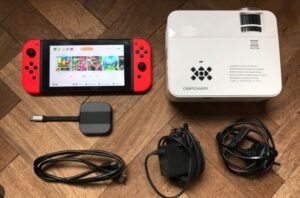
Before we dive into the setup process, let’s ensure you have everything you need. Firstly, make sure your Nintendo Switch is in good working condition. Check for any physical damages or performance issues. If everything looks good, you’re ready to move on to the next step.
Next, let’s verify the compatibility of your projector with the Nintendo Switch. Most projectors these days come equipped with HDMI ports, which makes it easy to connect your Switch. However, it’s essential to double-check that your projector supports HDMI input. If your projector has a USB-C port, we’ll cover that option too.
Gather the Right Cables
To make the connection between your Nintendo Switch and the projector, you’ll need the right cables. The most common and straightforward option is using an HDMI cable. Make sure you have a high-quality HDMI cable that can handle the data transfer between the console and the projector. If your projector supports USB-C connectivity, you can also use a USB-C cable for the connection. Keep in mind that using USB-C may offer additional benefits like simultaneous charging while playing.
Setting Up the Projector
Now that we’ve checked the compatibility and gathered the necessary cables, it’s time to set up the projector. Positioning the projector correctly is crucial for getting the best gaming experience. Find a suitable location where you can project the game on a clear and flat surface. Take note of the distance and angle required for the projector to display the image properly.
Once you’ve found the perfect spot, connect the projector to a stable power source. It’s essential to ensure a reliable power supply to avoid any interruptions during your gaming session.
Connecting the Nintendo Switch
With the projector all setup, it’s time to connect your Nintendo Switch. If you’re using an HDMI cable, plug one end into the HDMI port on your projector and the other end into the HDMI-out port on your Nintendo Switch dock. If you have a Nintendo Switch model with a built-in kickstand, you can also use an HDMI-to-mini HDMI adapter.
Directly connecting your Nintendo Switch to the projector requires a USB-C to USB-C cable.
Adjusting Settings for Best Performance
After making the physical connections, you may need to adjust some settings to ensure the best performance. On your Nintendo Switch, navigate to the display settings. Here, you can set the resolution and screen size to match your projector’s capabilities. Adjusting these settings will optimize the image quality for the big screen.
Similarly, explore the settings on your projector. You can fine-tune aspects like brightness, contrast, and color settings to get the perfect picture for your gaming sessions.
Troubleshooting and Tips
Sometimes, technical hiccups may occur during the setup process or while gaming on the projector. Don’t worry; we’ve got you covered! If you encounter any issues, check out our troubleshooting section for common problems and their solutions. We’ll guide you through fixes for problems like no signal, flickering, or input lag, so you can get back to gaming smoothly.
Additionally, we’ve prepared some gaming tips to enhance your projector setup experience. Certain games are exceptionally enjoyable on a big screen, and we’ll recommend a few titles to kickstart your larger-than-life gaming adventure.
Related:
FAQs about How to Connect Nintendo Switch to Projector
Can I connect any Nintendo Switch model to a projector?
Yes, you can connect any Nintendo Switch model to a projector as long as the projector has the necessary input ports. Most projectors support HDMI, which is the standard connection used for the Nintendo Switch. If your projector has a USB-C port, you can also use a USB-C to USB-C cable for the connection.
Do I need a specific type of projector for gaming with the Nintendo Switch?
While any projector with HDMI input can work with the Nintendo Switch, it’s ideal to choose a projector with decent resolution and low input lag for optimal gaming experience. Look for projectors with at least 1080p resolution and a gaming mode feature to minimize input lag.
What type of HDMI cable should I use for the connection?
It’s recommended to use a high-quality HDMI cable that supports HDMI 2.0 or higher for the best performance. These cables can handle higher resolutions and refresh rates, ensuring smooth gameplay on the big screen.
Can I charge my Nintendo Switch while it’s connected to the projector?
If you’re using the HDMI connection, you won’t be able to charge the Nintendo Switch while playing on the projector. However, if your projector has a USB-C port that supports Power Delivery, you can use a USB-C to USB-C cable to charge the Switch while playing.
How do I adjust the screen size and resolution on the projector?
To adjust the screen size, move the projector closer or farther from the projection surface. Most projectors have a zoom feature to fine-tune the screen size as well. For resolution settings, ensure your Nintendo Switch is set to the appropriate resolution in its display settings.
I connected everything, but I didn’t see any images on the projector. What should I do?
If you’re not seeing any images on the projector, check the following:
- Make sure the HDMI or USB-C cable is securely connected to both the projector and the Nintendo Switch.
- Ensure the projector is powered on and set to the correct input source (HDMI or USB-C).
- Double-check that your Nintendo Switch is functioning correctly and not in sleep mode.
Can I use a wireless connection to connect my Nintendo Switch to the projector?
Currently, Nintendo Switch doesn’t support wireless connections to projectors. You’ll need to use a physical HDMI or USB-C cable to establish the connection.
Is there a specific distance I should maintain between the projector and the projection surface?
The ideal distance between the projector and the projection surface depends on the projector’s specifications and the desired screen size. Consult your projector’s user manual for recommended projection distances based on screen size.
Can I play multiplayer games on the projector with friends?
Absolutely! Playing multiplayer games on the big screen can be a blast. Simply connect your Nintendo Switch to the projector, grab some extra controllers, and enjoy multiplayer gaming with your friends and family.
Are there any games that are particularly enjoyable on a projector setup?
Games with stunning visuals, expansive worlds, and epic battles shine on a projector setup. Titles like “The Legend of Zelda: Breath of the Wild,” “Super Mario Odyssey,” and “Mario Kart 8 Deluxe” are perfect choices for a larger-than-life gaming experience.
Conclusion
Congratulations, you’re now all set to enjoy the fantastic world of gaming on the big screen! Connecting your Nintendo Switch to a projector is a game-changer that brings a whole new dimension to your gaming sessions. We hope this guide has been helpful, and we encourage you to experiment with different setups to find what works best for you. Happy gaming!